
So, printing UV DTF transfers can turn into an exciting activity as you make custom designs for many surfaces. This process is popular in part because it uses special inks that can adhere to a variety of surfaces, including fabric, wood and metal. Sunika is dedicated to make it easier for you to print high quality dtf prints through this process. Regardless if you are a novice or have already experienced it, selecting the right printer and solving common problems can dominate your printing pursuit.
How to print uv dtf transfers?
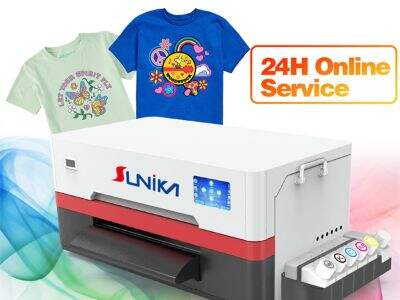
When you’re trying to choose the best UV DTF transfer printer, it’s key to consider your needs. You will want to look for a printer with great reviews and reputation for quality. With the right printer, you will save time and money. If you are hoping to print really big images, you may want a printer that can wrestle with big designs. Also take the speed of printer in to consideration. A speedy printer will let you get jobs done faster, a plus if you have a lot of orders. Consider the size of the printer as well. If you don’t have a lot of room to spare, than a more space-friendly model might be better. Price is another factor. Sunika provides printers that will meet a variety of budgets. Just remember to verify the warranty and customer service as well. If disaster strikes, you want to be able to reach help with a minimum of fuss. This information on the features of each printer will help you make a more informed decision. Features that protect the kitchen table or showcase the animals with beautiful color accuracy and ink usage are essential to getting great results. And don’t neglect reading reviews from users, as they can offer good insight on how the printer works in actual use. Picking out the right machine for you is key to achieving better dtf custom prints and having a more enjoyable journey.
No matter how good a printer you have, printing UV DTF transfers may involve some usual issues. One problem could be that the ink isn't adhering properly on the surface. This could occur if the surface wasn’t well-cleaned. And as always, make sure you clean the surface you are printing on before commencing play. A second problem could be colors looking wrong. This might happen if the printer settings are not configured in the right way. It’s crucial to verify the settings before printing. If your prints come out smudged, that likely means the ink didn’t dry quickly enough. You can correct for this drying time by giving more time or heat pressing the ink in place. Occasionally, the printer could even have a clog in its nozzles. Plumbing maintenance can also head this off. If you hear anything strange or notice any operations problems with the uv dtf machine, don’t disregard them. Refer to the user manual for troubleshooting steps. Sunika also has lessons to assist you in addressing these issues. Once you know what to do, you’ll be able to troubleshoot your way through and keep your printer humming along and generating beautiful transfers.
How to process your designs for UV DTF transfer printing?
If you want to create some awesome designs on shirts, bags or take your crafting hobby up a level, there are a few steps that you need to start out with. We, at Sunika, believe in the world of detailed preparation that leads to great transfers. Select the right software to design your can First, you should select which software you want to use to create your can design. Adobe Illustrator or CorelDRAW are some of the options that have gained most consensus. These tools allow you to make your design appear just the way you want it. And remember to use bright colors and simple patterns, which will be more distinguishable when printed. Then, the size of your design should be used. You will want to know the size of what you are printing on, so your design lines up correctly. For instance, if you are printing on a t-shirt, measure the spot that you want to be covered with design.
Once you’re done, save your design in a format that your printer can open. Most common formats are PNG and PDF. Ensure your design is high resolution, which means it should not be pixelated or blurry. This is going to make the transfer look so nice and sharp. Another important factor is to consider the colors you’re employing. Some colors may be slightly different in size and color compared to the picture because of the screen setting. Print a test page to see how your colors look. When you finished your designing and are satisfied with the outcome, it’s time to start your UV DTF Print. That could mean introducing an extra, specialized layer for transfer. At Sunika, we can help lead you on how to do this properly.
Last but not least: double-check all if everything is set straight before you start to print. Ensure your design is the correct format, size and color. Once everything is looking good, go ahead and print your UV DTF transfer! So here you are, ready to start with all the necessary preps to help you design something awesome that people are going to love.
Where to Buy the Top UV DTF Transfer Suppliers and Supply?
It is essential to find the best UV DTF transfer equipment and supplies suppliers to ensure that your printing project goes on well. Here at Sunika, we want to guide you in finding the right places so that you get what needs. Begin with some online research to start. Search for manufacturers who specializes in UV DTF printing materials. You can also check out reviews from other customers to view whether they are satisfied with their purchases. It can help you to discover trustworthy vendors that supply great high quality products.
Another good method is to join online groups or forums where people discuss various aspects of printing. You can also ask questions and receive recommendations from other UV DTF printing veterans. They’ll complain about the store they hated. Attending trade shows or expos that relate to printing is also helpful. Many venders display their wares at such staged events. You’re able to speak with them directly and inspect the equipment up close. It’s a good way to shop around for different products and prices.
When searching for a supplier, consider what materials you require, including transfer paper or inks. Ensure that the vendors you select can supply all of your requirements in one location. This could save you time and cash. You should also ensure that they have great customer support. It’s nice to know that if you have questions or need help, someone is there for you.
Finally, remember to compare the prices. Sometimes manufacturers provide bulk discounts, which is the tip for you if you want to spend less. At Sunika we know the importance of sourcing top suppliers so you can succeed in your uv DTF printing adventure. Once you have the right tools and materials, you can get started making incredible transfers.
How to maximize your UV DTF transfer process and improve the overall productivity?
There are some things you can take to make your UV DTF transfer process more efficient. Here at Sunika, we would like to share some tips with you so that you can start working faster and smarter. Then get your workspace in order First and foremost, it’s crucial to have an organized work space. A neat and organized space will help you easily locate what you need. Ensure that your tools and materials are in place. For instance, store your printer, inks, and transfer paper near each other. Less time searching for things and more time printing.
Next, try to develop a schedule. A step-by-step routine can help you work more efficiently. You can for example choose to create your designs first > unpack the printer > start printing. Following a consistent routine can make it easier to work more quickly — you know what comes next. And, try to limit distracts when you’re working. That means silencing your phone notifications or going to a place where you can print in peace. It’s important to keep this task and getting started on your task.
Another method to increase productivity is to educate yourself or your crew in the proper operation of equipment. Knowing the way your printer works and how to troubleshoot it yourself can save you time. If you encounter a problem, you can solve it on the spot rather than waiting for help. You might also search for shortcuts in the printing. For instance, if you are making multiple transfers of the same design, try to print several at a time. This is time savings and efficiency.
Lastly, monitor your progress. You then have to write down how long it took you to complete each task, so you can find ways of doing better. Perhaps you can’t stand the time it takes to clean the printer, and want to schedule that task on a regular basis. We at Sunika feel that by tailoring your UV DTF transfer process, you will be able to produce more aesthetically pleasing graphics and love the way you print.